Handling Asynchronous Process in Quarkus with JobRunr
Background processing play a crucial role in executing tasks that require efficient and parallel time utilization. This is essential to prevent processes from piling up on a single thread, allowing them to be handled by multiple threads instead. Quarkus framework offers kind of asynchronous processing methods compatible with real-time data batching and scheduling, such as Mutiny and Quartz. However, in this article, we will only discuss about the configuration and operation of JobRunr on Quarkus.
Intro to JobRunr
JobRunr is a Java dependency designed to handle background processes using Java 8 lambda expressions, enabling the implementation of reliable and easily manageable background tasks. It offers features such as fire-and-forget jobs, recurring jobs, scheduling, and delayed tasks. Additionally, JobRunr provides automatic retries for failed jobs, immediate job deletion, and the ability to re-trigger processed jobs through an auto-generated web dashboard. It utilizes relational databases (e.g., MySQL, PostgreSQL, or H2) to store job data, eliminating the need for additional infrastructure like Redis or Kafka.
However, JobRunr has certain limitations, including potential database bottlenecks when handling high volumes of background processes and the availability of advanced features exclusively in the Pro version.
JobRunr Properties
To begin, create a Quarkus project template using code.quarkus.io. Add extensions such as rest-assured, h2-database(as the data provider for storing data and job processes), quarkus-agroal (for database connection pooling), and the jobrunr extension.
Alternatively, after building the Quarkus project, you can add these extensions via the terminal:
./mvnw quarkus:add-extension -Dextensions="rest-assured,h2,agroal,jobrunr"Next, configure JobRunr in your application.properties file to enable the dashboard and background job server:
quarkus.jobrunr.background-job-server.enabled=true
quarkus.jobrunr.dashboard.enabled=true
quarkus.jobrunr.dashboard.port=9010
quarkus.jobrunr.background-job-server.delete-succeeded-jobs-after=24h
quarkus.jobrunr.background-job-server.permanently-delete-deleted-jobs-after=36h

quarkus.datasource.db-kind=h2
quarkus.datasource.jdbc.url=jdbc:h2:mem:default
quarkus.datasource.username=sa
In the application.properties file, we enable the JobRunr background job server and dashboard, and configure job deletion policies to prevent database bloat from accumulating job records. It's essential to set up the datasource for JobRunr before building the project, as this datasource will store all data executed by JobRunr. By default, JobRunr automatically deletes succeeded jobs after 36 hours and permanently removes them after 72 hours. But, you can customize this config based on your needed.
Create Background Job
Create a service class that defines a method to be executed as a background job. This method will be scheduled and monitored via the JobRunr dashboard.
@ApplicationScoped
public class OrderService {

    public String getCourier(UUID orderId) throws InterruptedException {
        Thread.sleep(5000);
        return "Get Courier to send order "+orderId;
    }

    public String sendOrder(UUID orderId) throws InterruptedException {
        Thread.sleep(3000);
        return "Send order "+orderId+" and get courier";
    }
}
Still in the OrderService class, add a method to initialize the background job. We can add more than one JobBuilder by using Stream
public void shippingOrder(UUID taskId) {
        BackgroundJob.create(Stream.of(
                JobBuilder.aJob()
                        .withName("Packing Order")
                        .withAmountOfRetries(5)
                        .withDetails(() -> sendOrder(taskId)),
                JobBuilder.aJob()
                        .withName("Get Courier")
                        .scheduleIn(Duration.ofMinutes(1L))
                        .withDetails(() -> getCourier(taskId))
        ));
 }
BackgroundJob is a class that provides the main features of JobRunr that have been mentioned at the beginning of the article and we can implement all the methods in JobRunr in this class. Meanwhile, according to its name, JobBuilder can add any method or task that we will register in the background process. Also determine additional configurations to adjust the environment of the job you want to run, such as .withAmountOfRetries(5) which will continue to trigger the sendOrder() method 5 times if it fails to execute and .scheduleIn() for the delayed task process based on the duration entered in the parameter. If you want to retry the job at the method level, add the Job annotation and the required parameters. This allows the Job to be run to be more readable and maintainable
@Job(name = "Shipping Order", retries = 5)
public void shippingOrder(UUID taskId) {
 //to do
}
Create a controller class to call the method that has been registered in BackgroundJob along with the endpoint:
@Path("api/v1")
@ApplicationScoped
public class OrderResource {

    @Inject
    OrderService orderService;

    @Inject
    JobScheduler jobScheduler;

}
Make sure we inject JobScheduler so that no exceptions occur: The JobScheduler has not been initialized. Use the fluent JobRunr.configure() API to setup JobRunr or set the JobScheduler via the static setter method.
In Quarkus, JobRunr initialization must be done before executing the job. Unlike Spring which by default will initialize JobRunr and use h2-database as the default Data Provider. Still in the OrderResource class, register the shippingOrder() method on the job queue:
@GET
@Produces(MediaType.TEXT_PLAIN)
@Path("/order")
public Response taskOrder() {
jobScheduler.enqueue(() -> orderService.shippingOrder(UUID.randomUUID()));
return Response.ok("Done").build();
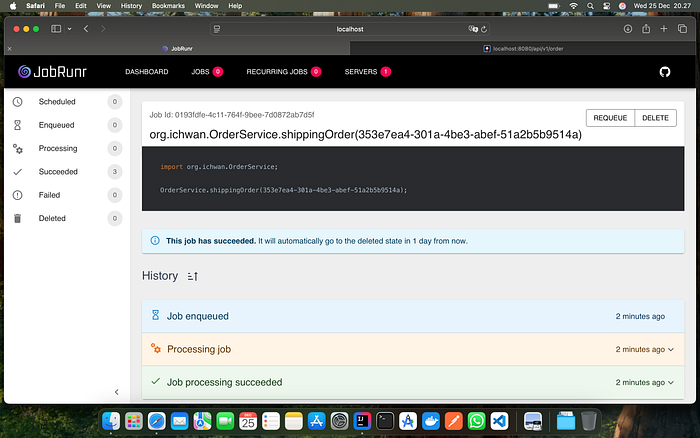
}Enqueue job ensures that registered tasks will be executed sequentially. Hit the API above with the endpoint http://localhost:8080/api/v1/order then access the JobRunr dashboard at http://localhost:9091/dashboard, we can directly monitor the Job that is currently running.
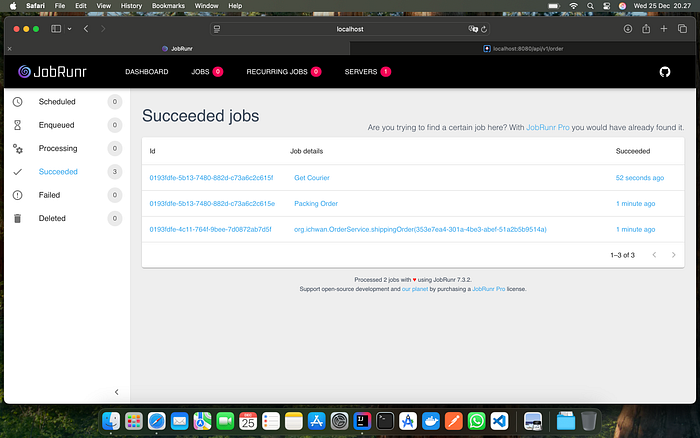
Above is the situation when all jobs are successfully executed. The task will first enter the Enqueued menu to execute the shippingOrder() method for 5 seconds and then run 2 jobs in it. The Packing Order job directly enters the Processing section while the Get Courier job will experience a delay process and be run first in the Scheduled section for 1 minute according to the scheduleIn() parameter. We can also re-trigger the job via the REQUEUE button and will experience the same process as at the beginning
If you want to do a job recurrently, add the following method to the OrderResource class. The job will be executed according to the duration we enter in the parameter.
    @GET
    @Produces
    @Path("/notify")
    public Response notifyUser() {
        jobScheduler.scheduleRecurrently("*/1 * * * *", () -> System.out.println("Notify to user"));
        return Response.ok("Success").build();
    }
Get Query JobRunr
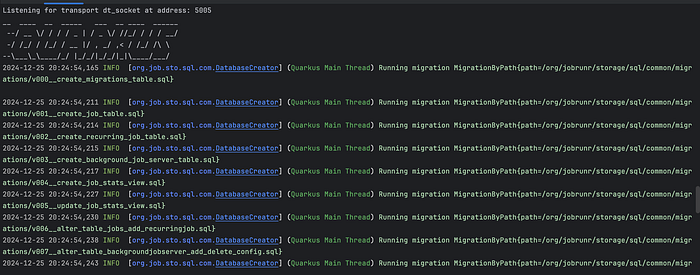
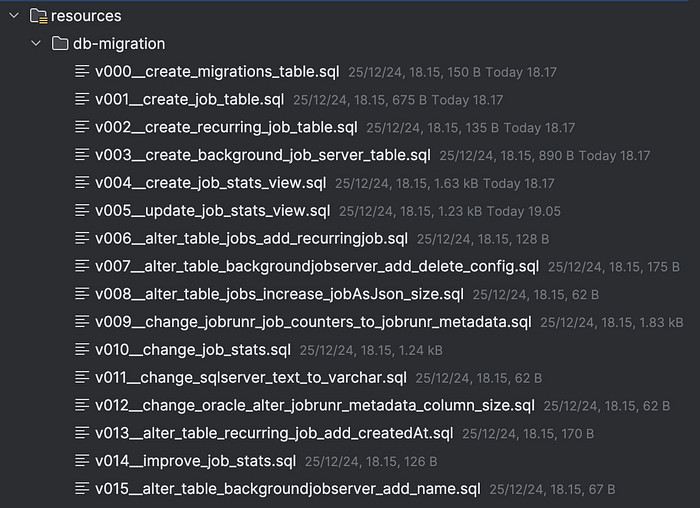
When a project is built, JobRunr will run a database migration process that stores information about what jobs are being run.
We can also download all tables in db-migration via the DatabaseSqlMigrationFileProvider class and then pass appropriate arguments to the key to generate queries based on the database type.
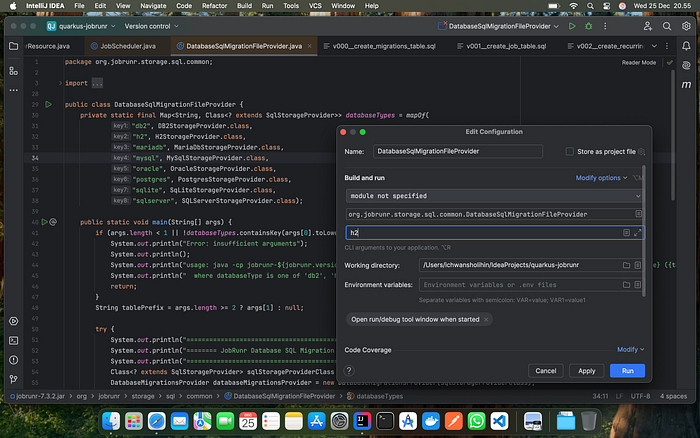
Set the working directory to store the tables and from that class will generate all the tables used to store job process information.
This allows us to change the ID to increment, connect to third party services and other customizations.
Follow me on LinkedIn, Github, Dev.to, and Instagram.
Thank you for being a part of the community
Before you go:
- Be sure to clap and follow the writer ️👏️️
- Follow us: X | LinkedIn | YouTube | Newsletter | Podcast
- Check out CoFeed, the smart way to stay up-to-date with the latest in tech 🧪
- Start your own free AI-powered blog on Differ 🚀
- Join our content creators community on Discord 🧑🏻💻
- For more content, visit plainenglish.io + stackademic.com